
How to perform Gaussian Splatting?
The Gaussian Splatting Python scripts are provided in the original publication - 3D Gaussian Splatting for Real-Time Radiance Field Rendering. To use these scripts, you must first set up the required Python environment. While the setup may seem straightforward, I encountered several challenges during the process that I document here to help others avoid them.
The code was first published in 2023, and many dependencies are no longer readily available or compatible with the latest software versions. A common mistake I made was attempting to run it with the most up-to-date packages, which led to numerous incompatibility issues.
Hardware Specification
- GPU: Nvidia GeForce RTX 4070, 8 GB VRAM
- Driver version: 580.88
- CUDA: 11.8
- CPU: Intel i7-13620H
- OS: Windows 11
- RAM: 40 GB (Windows page file 60 GB)
Python and Package installation
I installed both Python 3.8 and 3.10, finding Python 3.10 generally more compatible with most packages since 3.8 is becoming obsolete. Most packages install smoothly as pre-compiled wheels, but some, especially CUDA-related custom modules in Gaussian Splatting, require local compilation.
Making sure the compilation tools are of the compatible version with these packages can be tricky. Since most of the time, the authors would not have tested many cases and their success configuration may not be the same as what I have got. After many experiments by trial and error, I have worked out a solution as follows:
-
Microsoft Visual Studio Build Tools 2019 (v143 toolset):
Avoid the latest Visual Studio versions like 17.14, which are not backward compatible. - Always compile from the VS x64 Native Tools Command Prompt to ensure the correct compiler is called.
With this setup, I could follow the official installation guides without issues.
Tips and Common Issues
Tips: If we use install torch and torch related packages on pip, it is likely that pip install the CPU-only version. So please visit Pytorch official website to get the CUDA-enabled version that is compatible for your device.
Watch out for: OMP: Error #15: Initializing libiomp5md.dll, but found libiomp5md.dll already initialized. OMP: Hint This means that multiple copies of the OpenMP runtime have been linked into the program. That is dangerous, since it can degrade performance or cause incorrect results. The best thing to do is to ensure that only a single OpenMP runtime is linked into the process, e.g. by avoiding static linking of the OpenMP runtime in any library. As an unsafe, unsupported, undocumented workaround you can set the environment variable KMP_DUPLICATE_LIB_OK=TRUE to allow the program to continue to execute, but that may cause crashes or silently produce incorrect results. For more information, please see http://www.intel.com/software/products/support/.
Crash and blue-screen
Initially, frequent crashes were blamed on Python or the packages. In hindsight, I have figured out the importance and usefulness of windows operating system event report feature. On many occasions, the system crashed due to mis-configured libraries and system settings. Of course, I had no idea at the beginning and mis-attributed the crash due to Python and its packages. After reinstalling Python and its packages, the situation showed no sign of any improvement. I then studied the event report features on windows to get a better understanding on what did occur right before a crash (Windows Event Viewer). The WINDGB tool was very useful because a dump file was generated to record the exact event and all the related programs or dll at that time right after the crash. WINDGB revealed the core issue - multiple CUDA versions installed on the system. I had installed and uninstalled different CUDA versions which corrupted Nvidia dll and caused several errors.
Final solution: Thus, the final solution is to update all the graphical drivers and libraries because all evidence pointed to an urgent driver updates (Nvidia and Intel graphic cards). After a CLEAN installation of the latest drivers, the crash had ceased eventually . As for CUDA, keep one and only one version (in this case CUDA 11.8) on the system. Otherwise, python setup may compile the source code against the wrong version.
In addition to software upgrades, shutdown all memory intensive programs prior to running Python and increase Windows’ page memory as much as possible.
After this step, system stability was restored and crashes stopped.
Training 3D Gaussian Splatting
# Run 3D AND 2D gaussian splatting train script
python train.py -s C:\Users\hp\tableTop\gs\3dmodeling\data\3dcarm\extracted_frames_VID_20250725_172445_20 -m ./outputs/VID_20250725_172445_20_93 --resolution 8 --iterations 93000 --densification_interval 100 --opacity_reset_interval 3000 --densify_from_iter 500 && python train.py -s C:\Users\hp\tableTop\gs\3dmodeling\data\3dcarm\extracted_frames_VID_20250725_175410_20 -m ./outputs/VID_20250725_175410_20_93 --resolution 8 --iterations 93000 --densification_interval 100 --opacity_reset_interval 3000 --densify_from_iter 500


python train.py -s C:\Users\hp\tableTop\gs\3dmodeling\data\3dcarm\extracted_frames_VID_20250725_173235_20\15 -m ./outputs/VID_20250725_173235_20_93\15 --resolution 8 --iterations 93000 --densification_interval 100 --opacity_reset_interval 3000 --densify_from_iter 500


Note: this laptop has limited GPU memory. See computer specification, so the images are downscaled by a multiple of 8. i.e. from 1080x1920 -> 135x240
Results
The Gaussian Splatting model was evaluated on a C-arm machine configured in both Anterior-Posterior (AP) and Medial-Lateral (ML) poses.
There are two ways to assess the quality:
- Quantitative metrics: SSIM, PSNR, and LPIPS scores provide numerical evaluation of image quality.
- Qualitative visualization: Using Splatviz, which allows intuitive inspection of the reconstructions.
SSIM, PSNR, LPIPS
# evaluation script (evaluation on test images , a total of 53)

python render.py --iteration 93000 -s C:\Users\hp\tableTop\gs\3dmodeling\data\3dcarm\extracted_frames_VID_20250725_172445_20 -m ./outputs/VID_20250725_172445_20_93 --eval --skip_train && python render.py --iteration 7000 -s C:\Users\hp\tableTop\gs\3dmodeling\data\3dcarm\extracted_frames_VID_20250725_172445_20 -m ./outputs/VID_20250725_172445_20_93 --eval --skip_train && python render.py --iteration 30000 -s C:\Users\hp\tableTop\gs\3dmodeling\data\3dcarm\extracted_frames_VID_20250725_172445_20 -m ./outputs/VID_20250725_172445_20_93 --eval --skip_train

python metrics.py --model_paths .\outputs\VID_20250725_172445_20_93

python render.py --iteration 7000 -s C:\Users\hp\tableTop\gs\3dmodeling\data\3dcarm\extracted_frames_VID_20250725_175410_20 -m ./outputs/VID_20250725_175410_20_93 --eval --skip_train
python render.py --iteration 30000 -s C:\Users\hp\tableTop\gs\3dmodeling\data\3dcarm\extracted_frames_VID_20250725_175410_20 -m ./outputs/VID_20250725_175410_20_93 --eval --skip_train
python render.py --iteration 93000 -s C:\Users\hp\tableTop\gs\3dmodeling\data\3dcarm\extracted_frames_VID_20250725_175410_20 -m ./outputs/VID_20250725_175410_20_93 --eval --skip_train

python metrics.py --model_paths .\outputs\VID_20250725_175410_20_93

python render.py --iteration 93000 -s C:\Users\hp\tableTop\gs\3dmodeling\data\3dcarm\extracted_frames_VID_20250725_173235_20 -m ./outputs/VID_20250725_173235_20_93 --eval --skip_train && python render.py --iteration 7000 -s C:\Users\hp\tableTop\gs\3dmodeling\data\3dcarm\extracted_frames_VID_20250725_173235_20 -m ./outputs/VID_20250725_173235_20_93 --eval --skip_train && python render.py --iteration 30000 -s C:\Users\hp\tableTop\gs\3dmodeling\data\3dcarm\extracted_frames_VID_20250725_173235_20 -m ./outputs/VID_20250725_173235_20_93 --eval --skip_train

python metrics.py --model_paths .\outputs\VID_20250725_173235_20_93
Anterior Posterior
AP Orientation
At iteration 7000
SSIM :    0.9049926
PSNR :   25.9037876
LPIPS:    0.1312765
At iteration 30000
SSIM :    0.9583084
PSNR :   30.5848618
LPIPS:    0.0602733
At iteration 93000
SSIM :    0.9692391
PSNR :   32.1568565
LPIPS:    0.0452350
Medial Lateral
Vertical camera frames
At iteration 7000
SSIM :    0.9277247
PSNR :   26.7998466
LPIPS:    0.0987048
At iteration 30000
SSIM :    0.9654269
PSNR :   30.7180729
LPIPS:    0.0463373
At iteration 93000
SSIM :    0.9736962
PSNR :   32.5040054
LPIPS:    0.0358106
Horizontal camera frames
At iteration 7000
SSIM :    0.8346600
PSNR :   22.8985519
LPIPS:    0.2103405
At iteration 30000
SSIM :    0.9369362
PSNR :   28.4063663
LPIPS:    0.0972803
At iteration 93000
SSIM :    0.9571357
PSNR :   30.3842888
LPIPS:    0.0668879
All in all, the Gaussian Splatting results are very good. Indeed, the more iterations, the better the quality. (albeit the improvement slows drastically)
The videos were shot in two different camera orientations. The vertical and the horizontal show very similar end results. I think so long as the video quality is good and the reconstruction is accurate, Gaussian Splatting is quite robust that camera orientation does not matter.
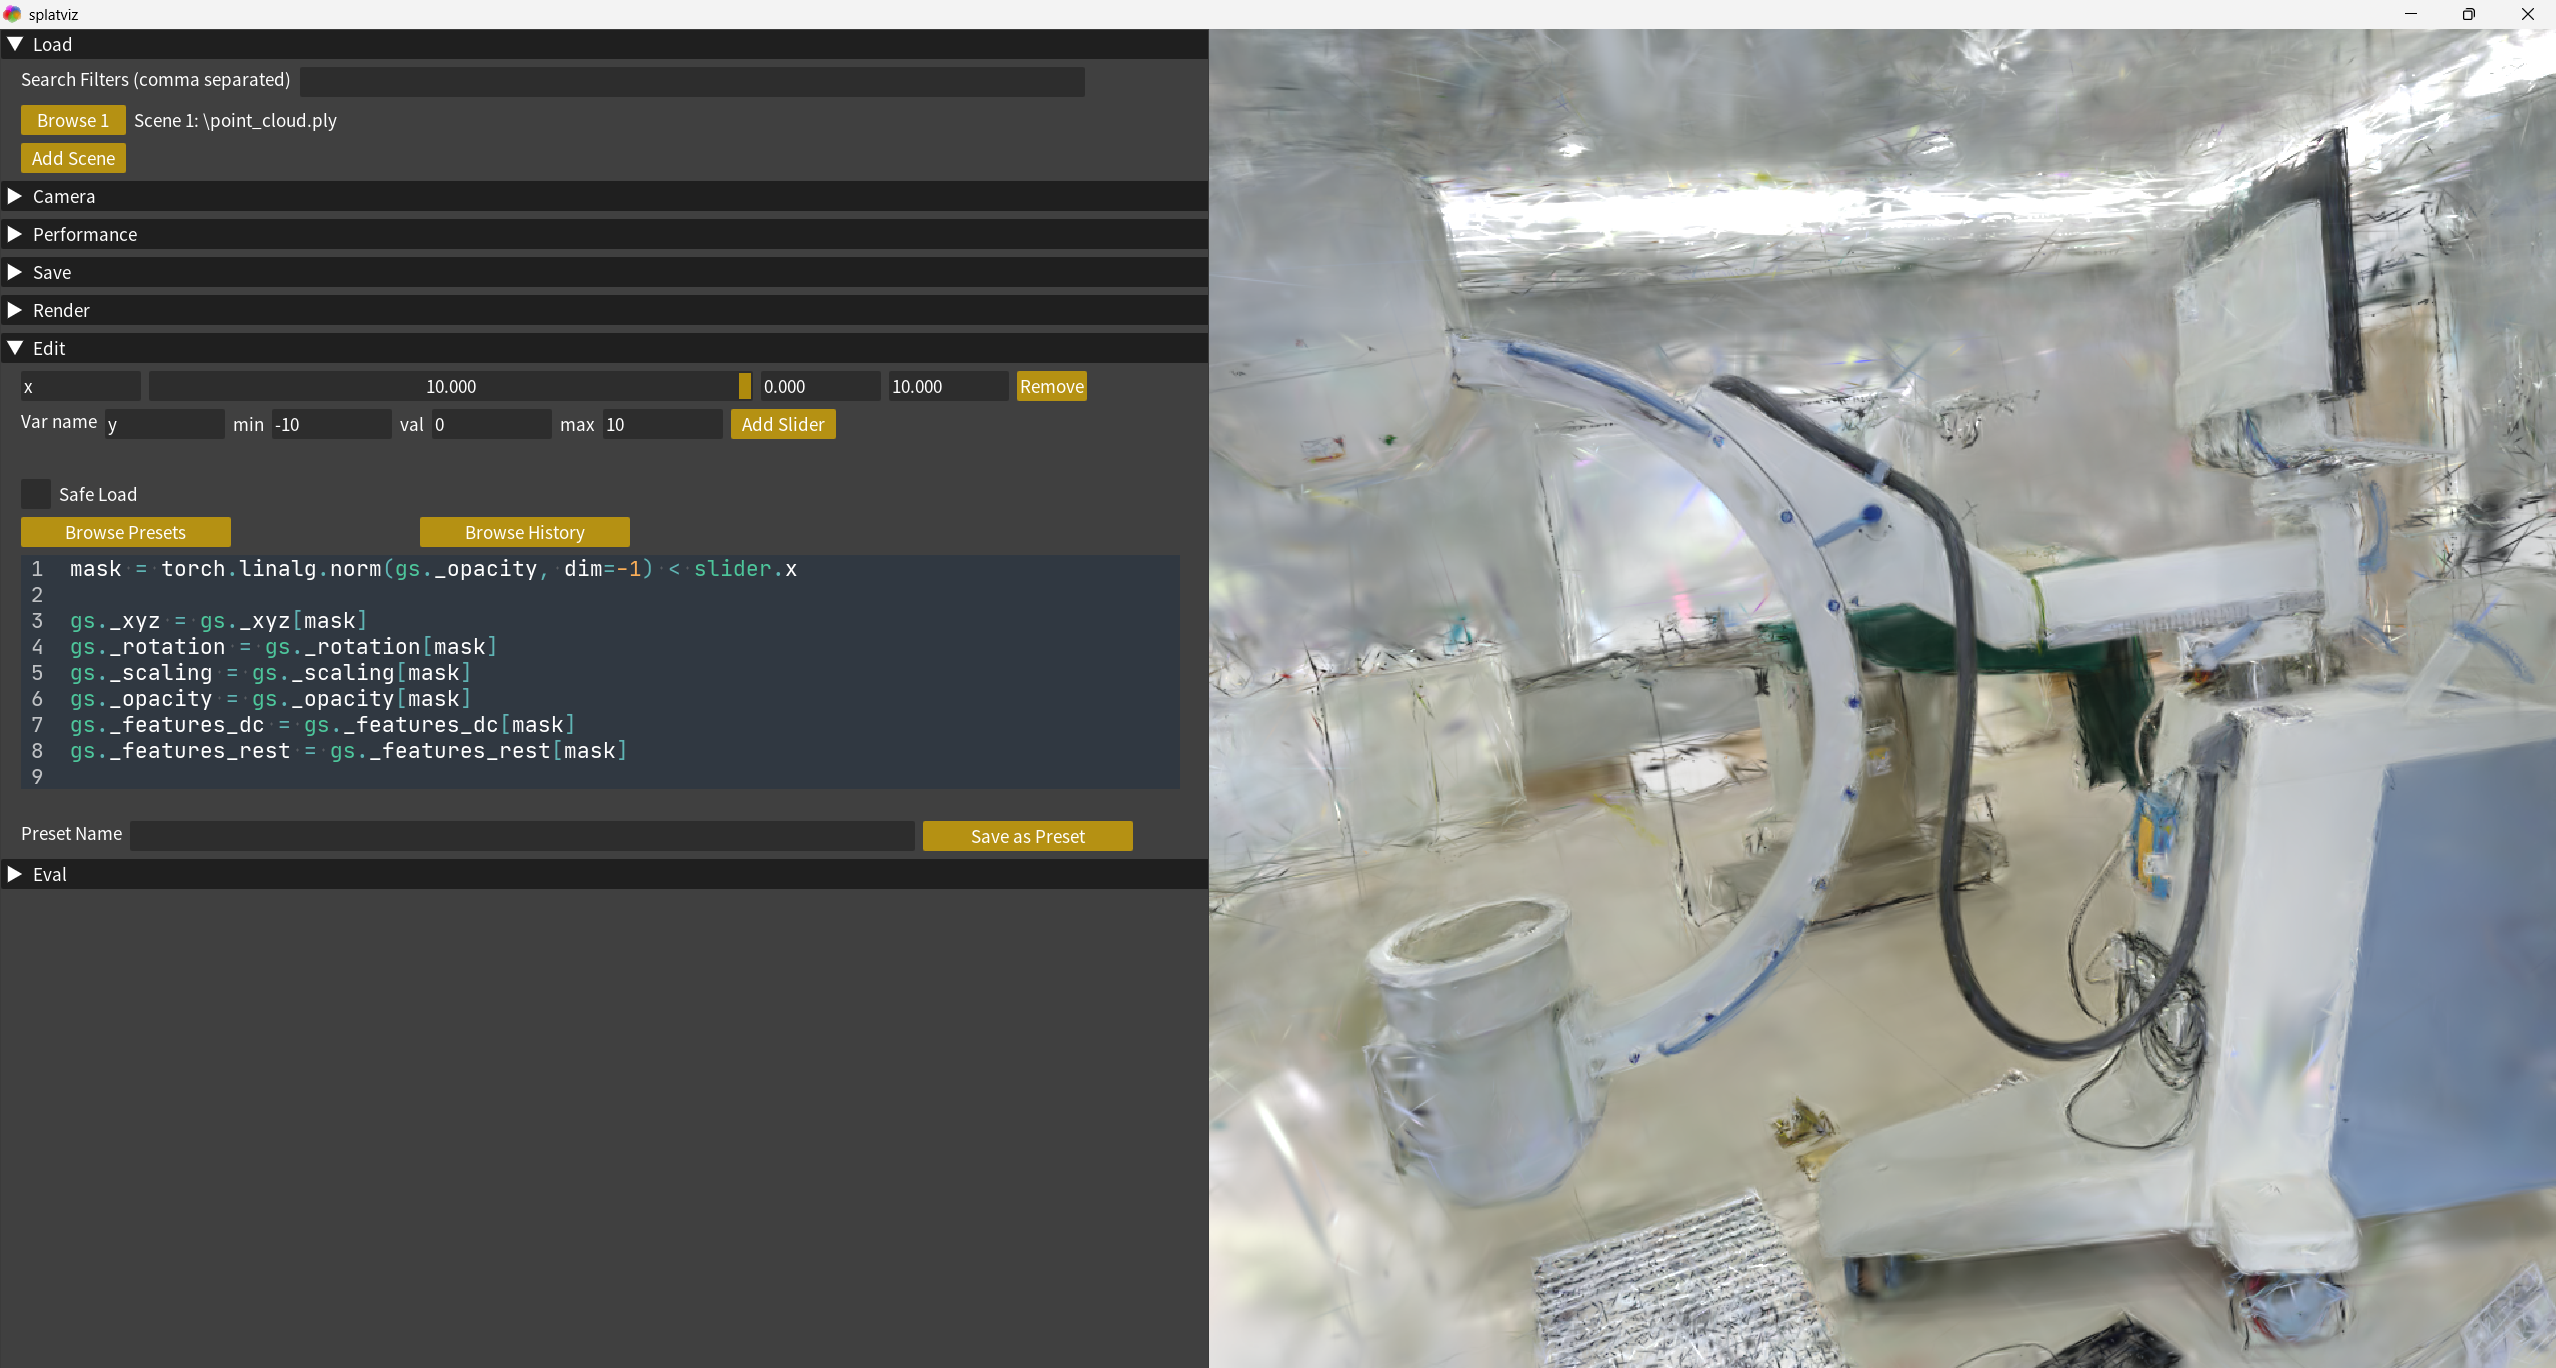
Splatviz
# Run splat-vis for visualization

python run_main.py --data_path=C:\Users\hp\tableTop\gs\gaussian-splatting\outputs\VID_20250725_172445_20_93_previous\point_cloud\iteration_93000
python run_main.py --data_path=C:\Users\hp\tableTop\gs\gaussian-splatting\outputs\VID_20250725_172445_20_93\point_cloud\iteration_30000


python run_main.py --data_path=C:\Users\hp\tableTop\gs\gaussian-splatting\outputs\VID_20250725_172445_20_93\point_cloud\iteration_93000
python run_main.py --data_path=C:\Users\hp\tableTop\gs\gaussian-splatting\outputs\VID_20250725_175410_20_93\point_cloud\iteration_93000
Anterior Posterior
Medial Lateral
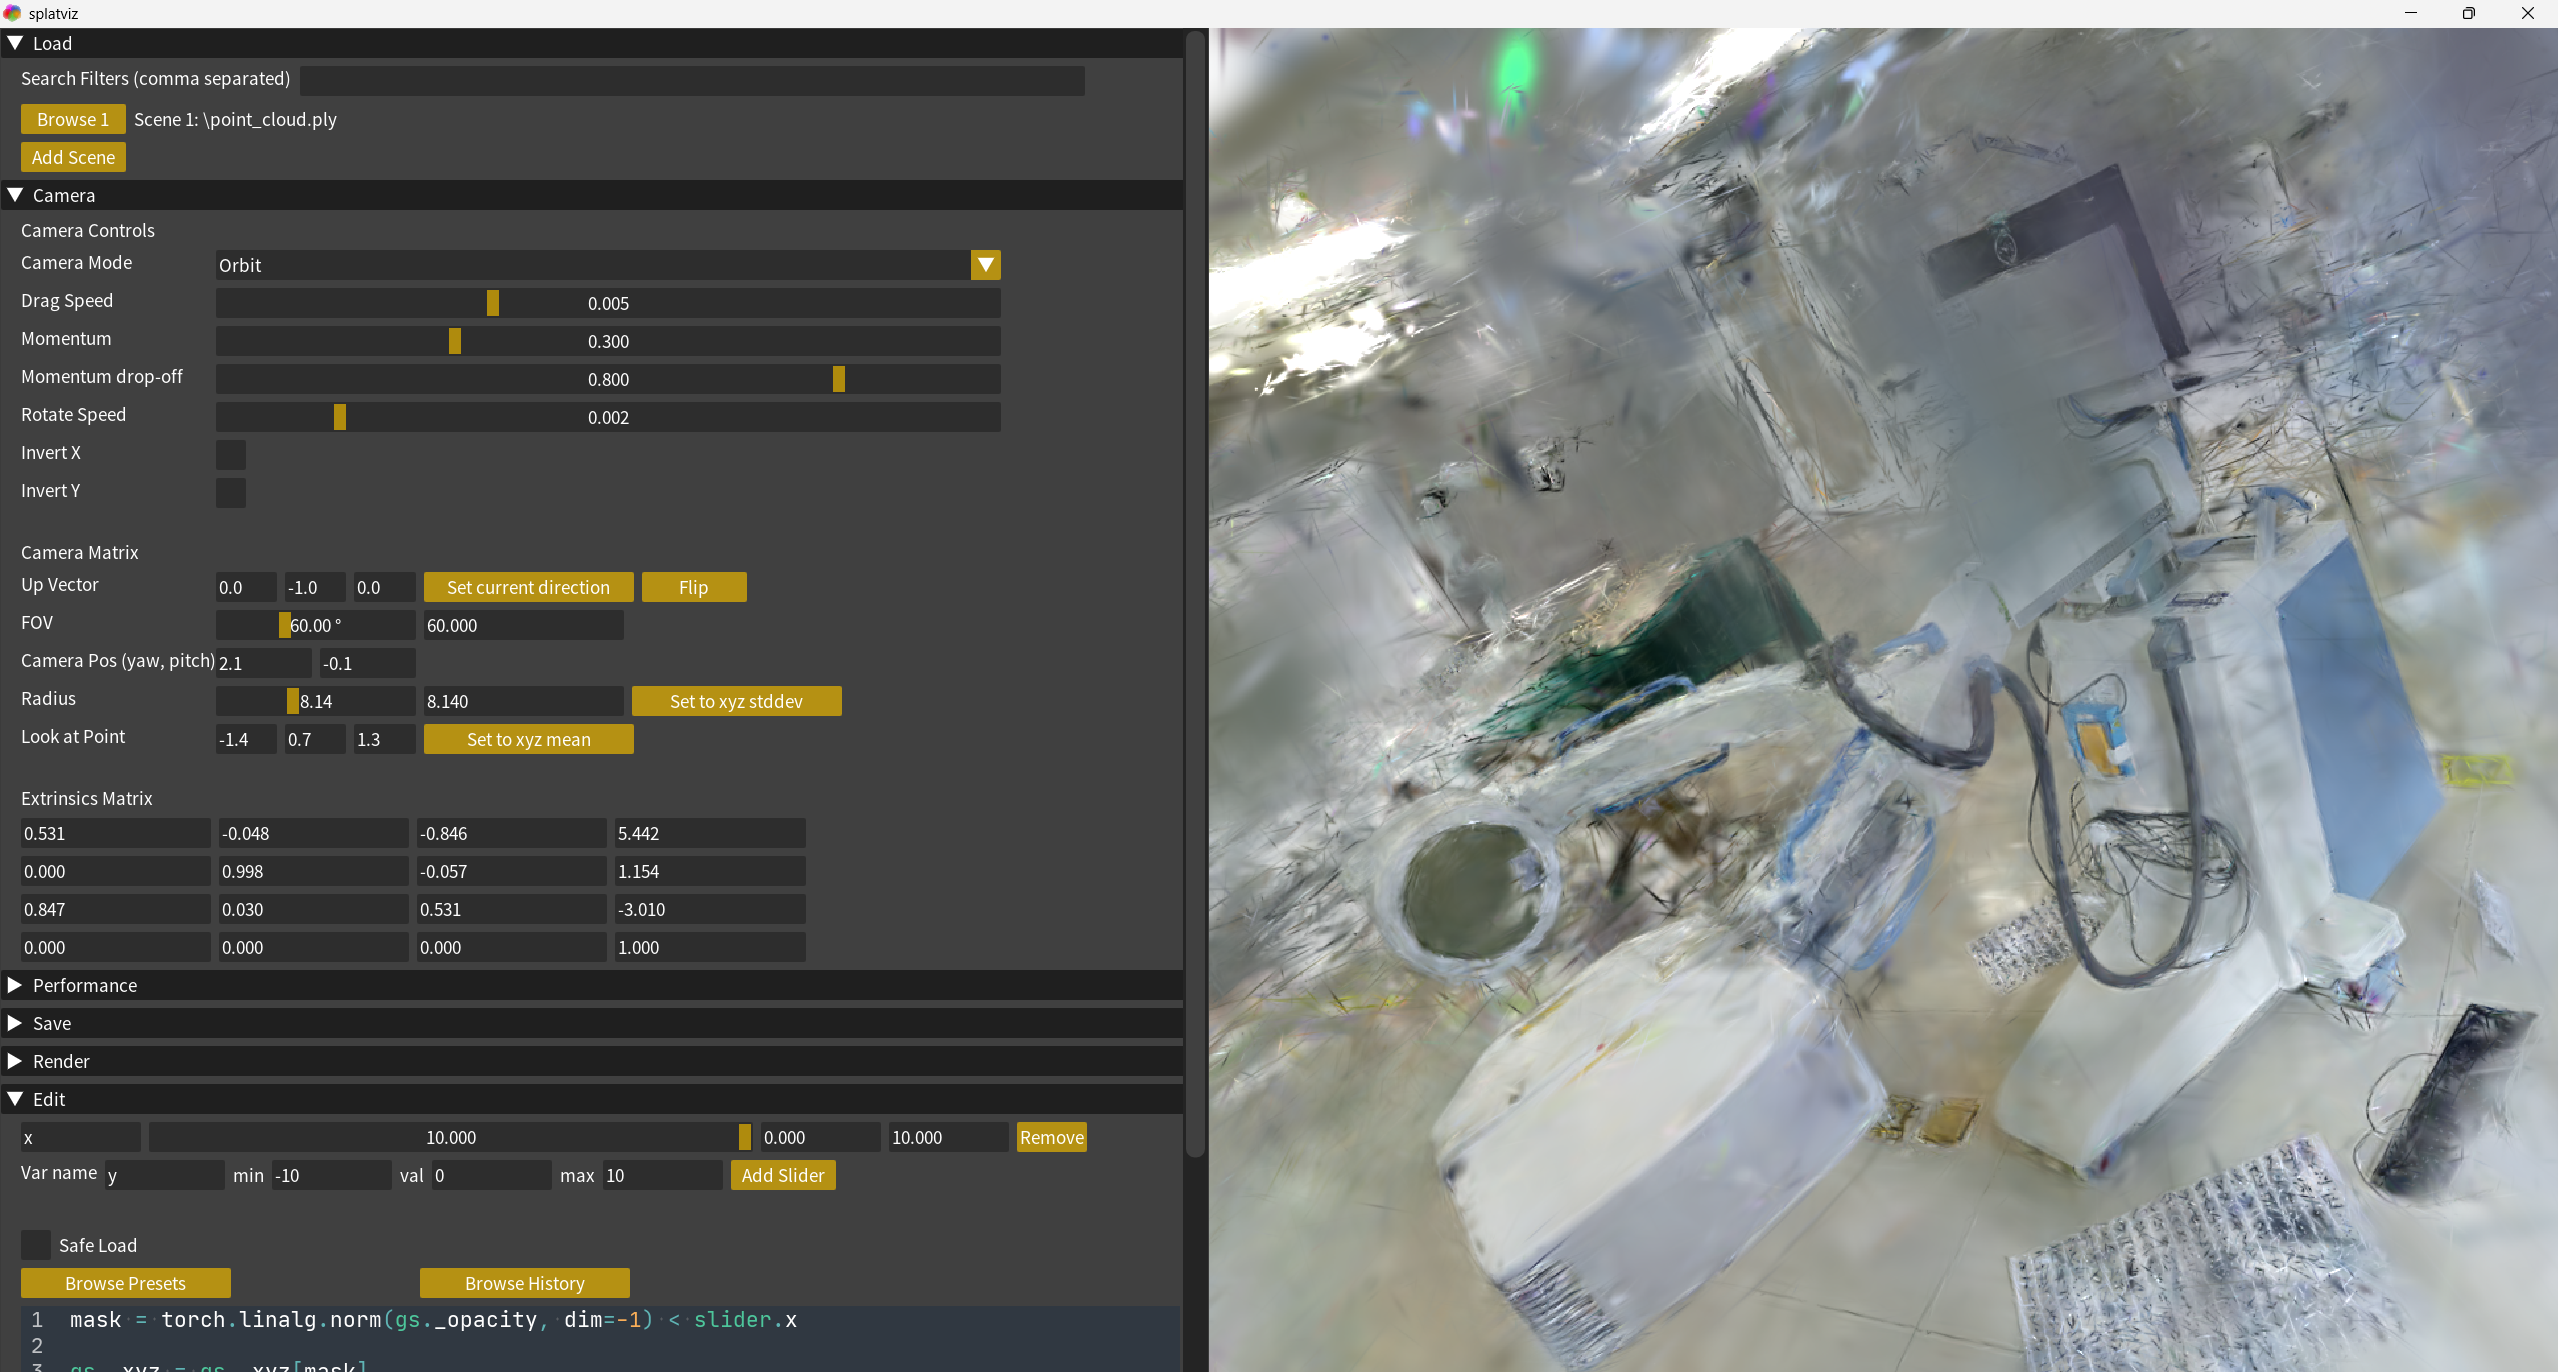
Zoom in block to indicate filtering script for Gaussian ellipsoids display
filter Gaussian ellipsoids
mask = torch.linalg.norm(gs._scaling, dim=-1) < slider.x

gs._xyz = gs._xyz[mask]
gs._rotation = gs._rotation[mask]
gs._scaling = gs._scaling[mask]
gs._opacity = gs._opacity[mask]
gs._features_dc = gs._features_dc[mask]
gs._features_rest = gs._features_rest[mask]


mask = torch.linalg.norm(gs._opacity, dim=-1) < slider.x

gs._xyz = gs._xyz[mask]
gs._rotation = gs._rotation[mask]
gs._scaling = gs._scaling[mask]
gs._opacity = gs._opacity[mask]
gs._features_dc = gs._features_dc[mask]
gs._features_rest = gs._features_rest[mask]
2DGS: 2D Gaussian Splatting for Geometrically Accurate Radiance Fields
2D Gaussian Splatting extends 3D Gaussian Splatting by addressing its limitation in representing mainly volumetric structures but not surfaces. Surfaces are better represented by 2D surfels, which are surface elements defined by:
- A 2D tangential disk with radius r and a center point.
- A normal vector pointing outward.
- Graphics data such as color, texture, and depth.
Unlike meshes, surfels do not require connectivity between elements, allowing flexible level-of-detail adaptation: smaller and denser surfels for close-ups, larger and fewer for distant views, balancing quality and computation.
Using 2D Gaussian Splatting for 3D Mesh Extraction of the C-arm Machine
I chose 2D Gaussian Splatting over the 3D version to extract surface meshes of the C-arm machine. The surfel surfaces were exported as PLY meshes or point clouds.
# mesh extraction and video generation

python render.py -m C:\Users\hp\tableTop\gs\2d-gaussian-splatting\outputs\VID_20250725_172445_20_93 -s C:\Users\hp\tableTop\gs\3dmodeling\data\3dcarm\extracted_frames_VID_20250725_172445_20 --unbounded --mesh_res 2048 && python render.py -m C:\Users\hp\tableTop\gs\2d-gaussian-splatting\outputs\VID_20250725_175410_20_93 -s C:\Users\hp\tableTop\gs\3dmodeling\data\3dcarm\extracted_frames_VID_20250725_175410_20 --unbounded --mesh_res 2048

python render.py -m C:\Users\hp\tableTop\gs\2d-gaussian-splatting\outputs\VID_20250725_173235_20_93 -s C:\Users\hp\tableTop\gs\3dmodeling\data\3dcarm\extracted_frames_VID_20250725_173235_20 --unbounded --mesh_res 2048 --render_path
python render.py -m C:\Users\hp\tableTop\gs\2d-gaussian-splatting\outputs\VID_20250725_173235_20_93\15 -s C:\Users\hp\tableTop\gs\3dmodeling\data\3dcarm\extracted_frames_VID_20250725_173235_20\15 --unbounded --mesh_res 2048 --render_path
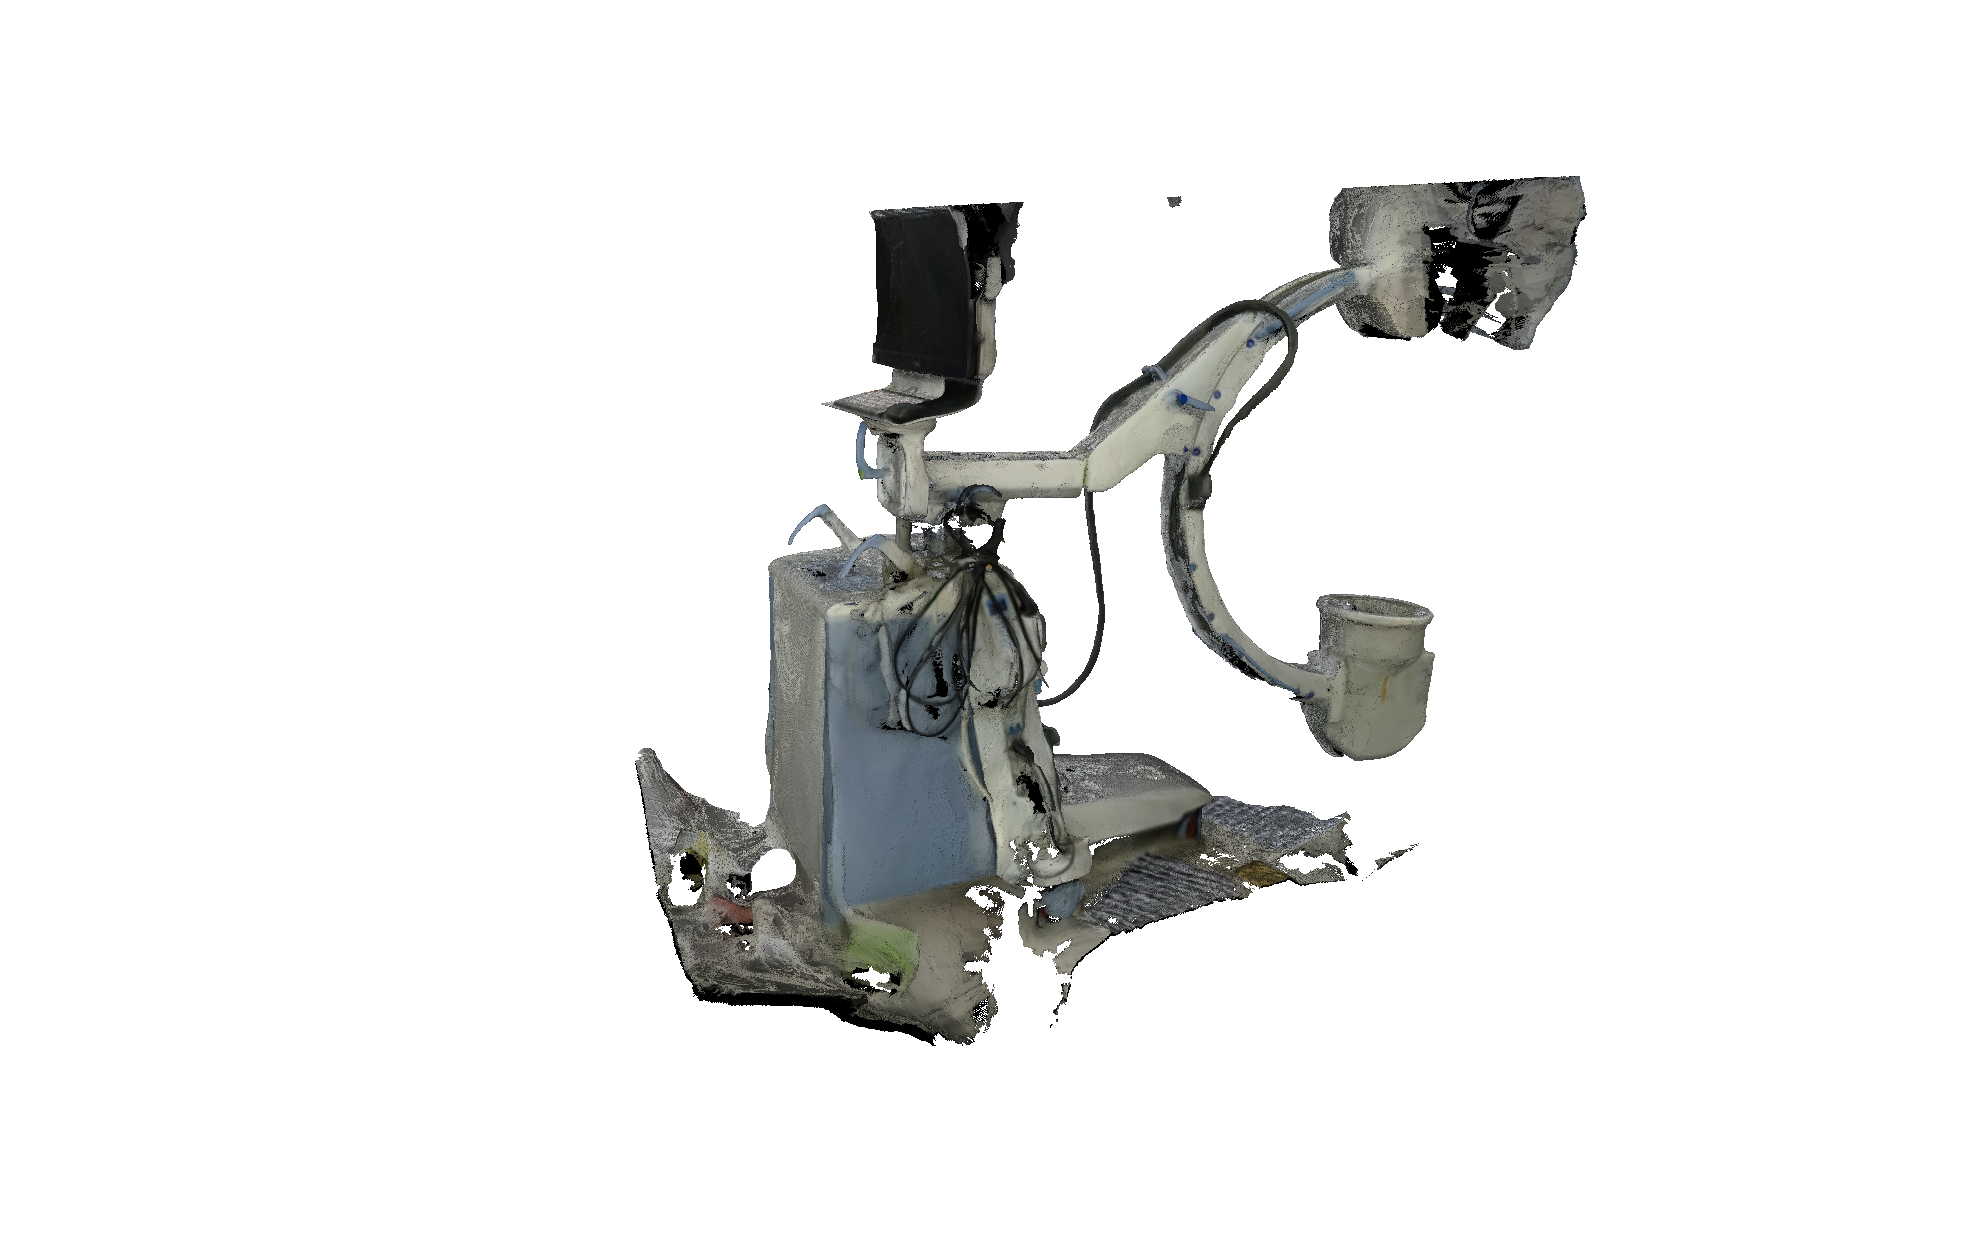
Anterior Posterior

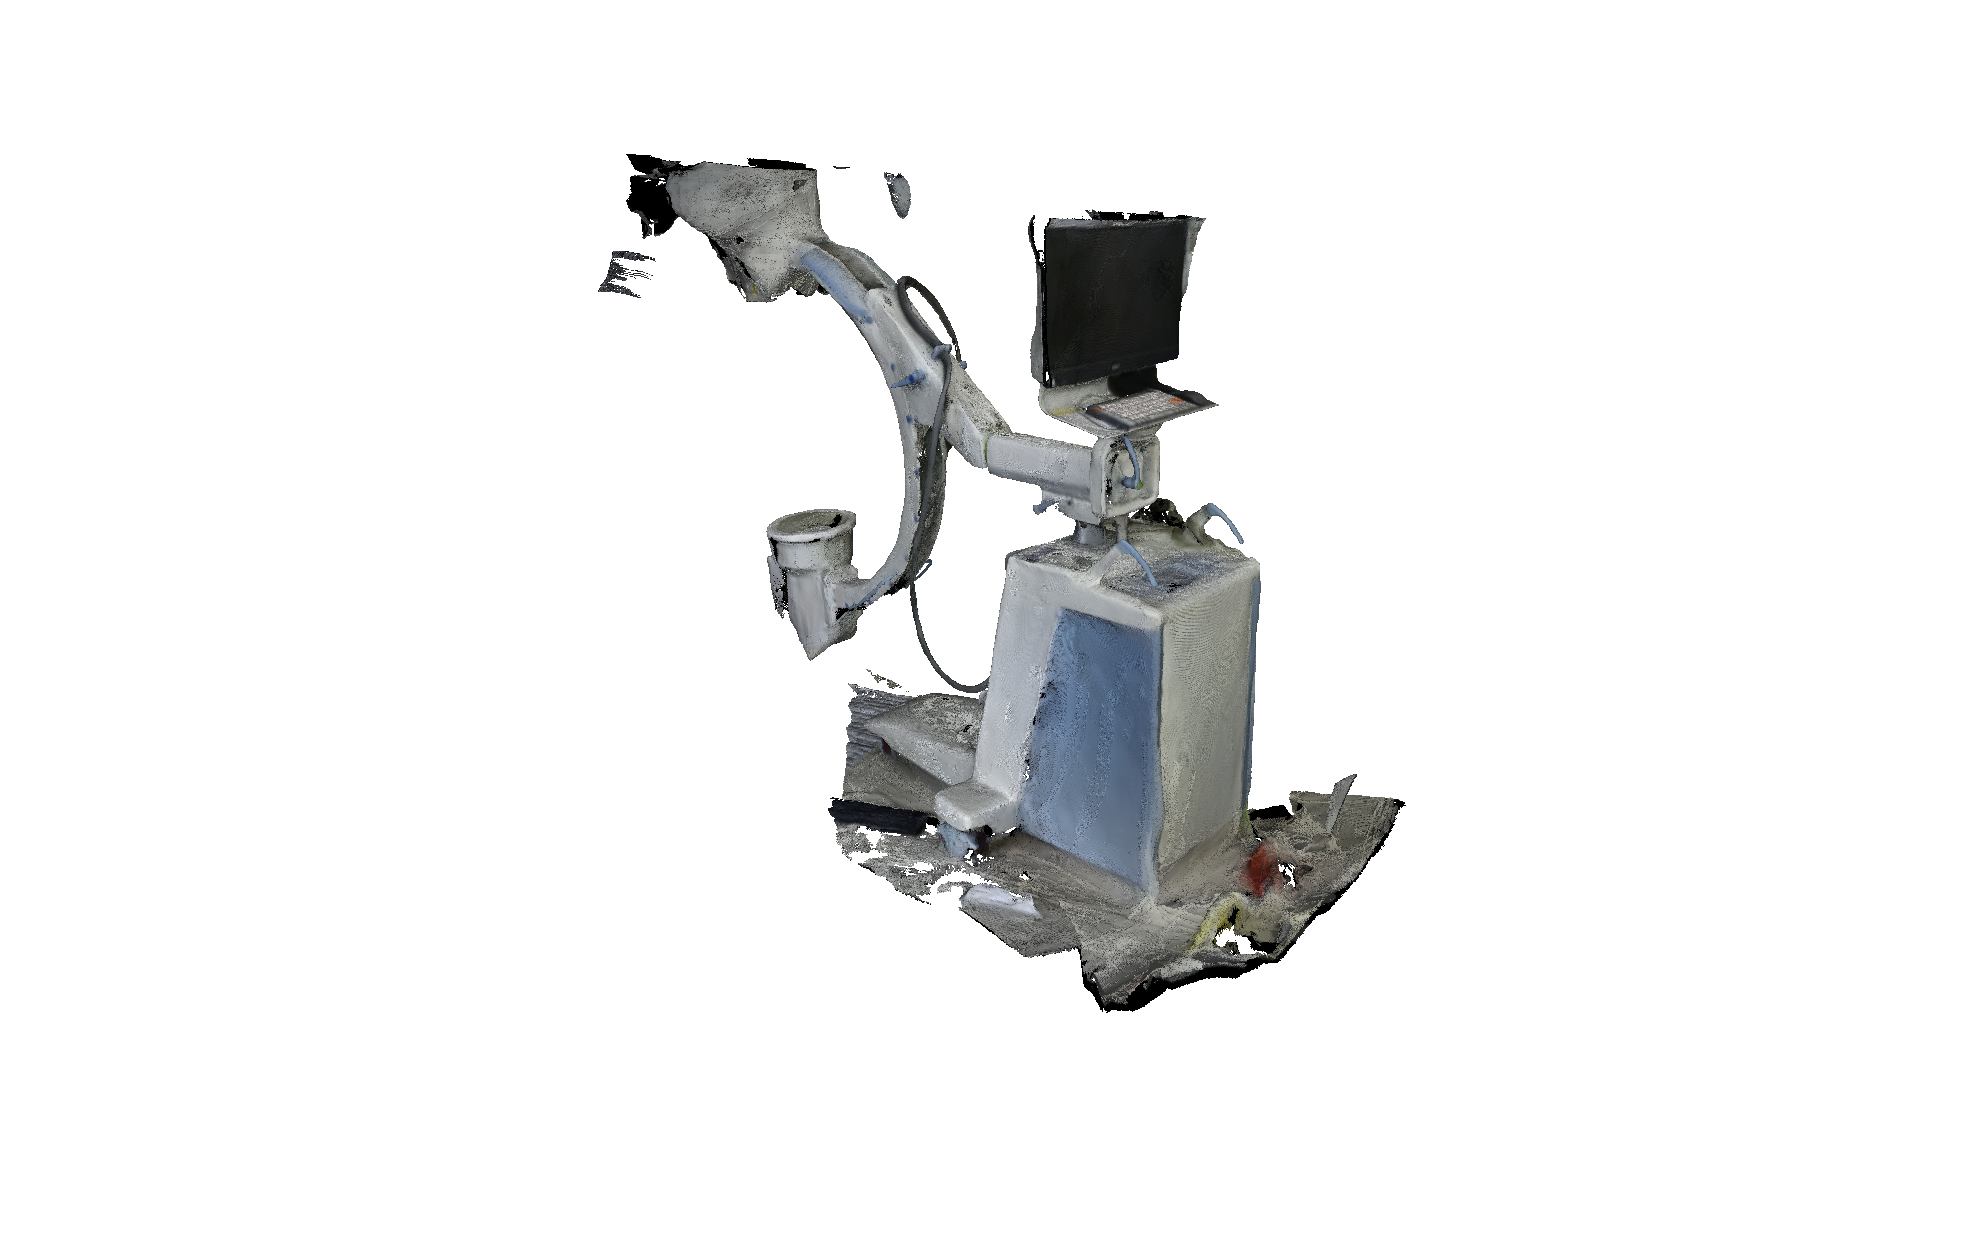
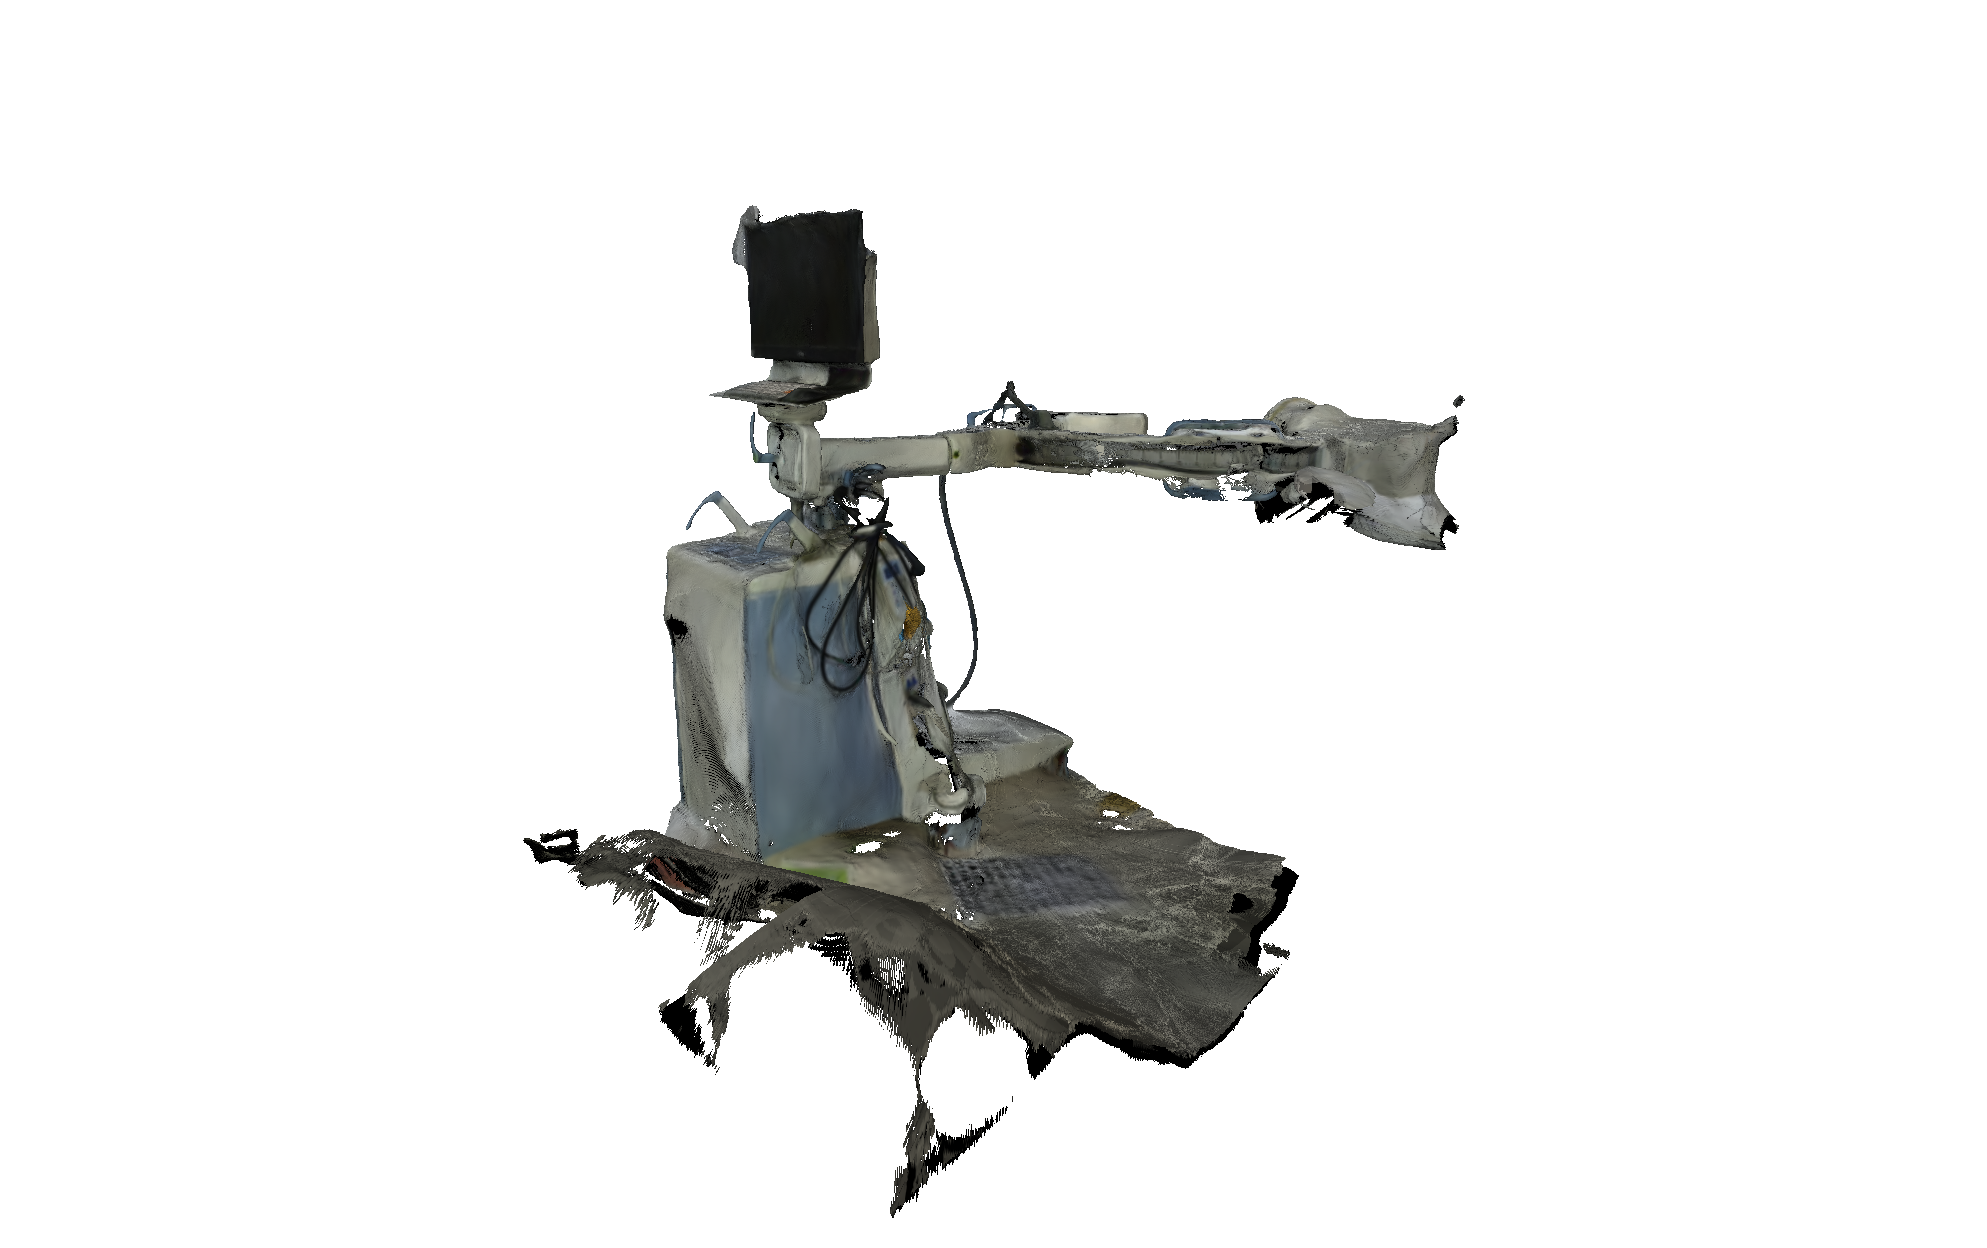
Medial Lateral
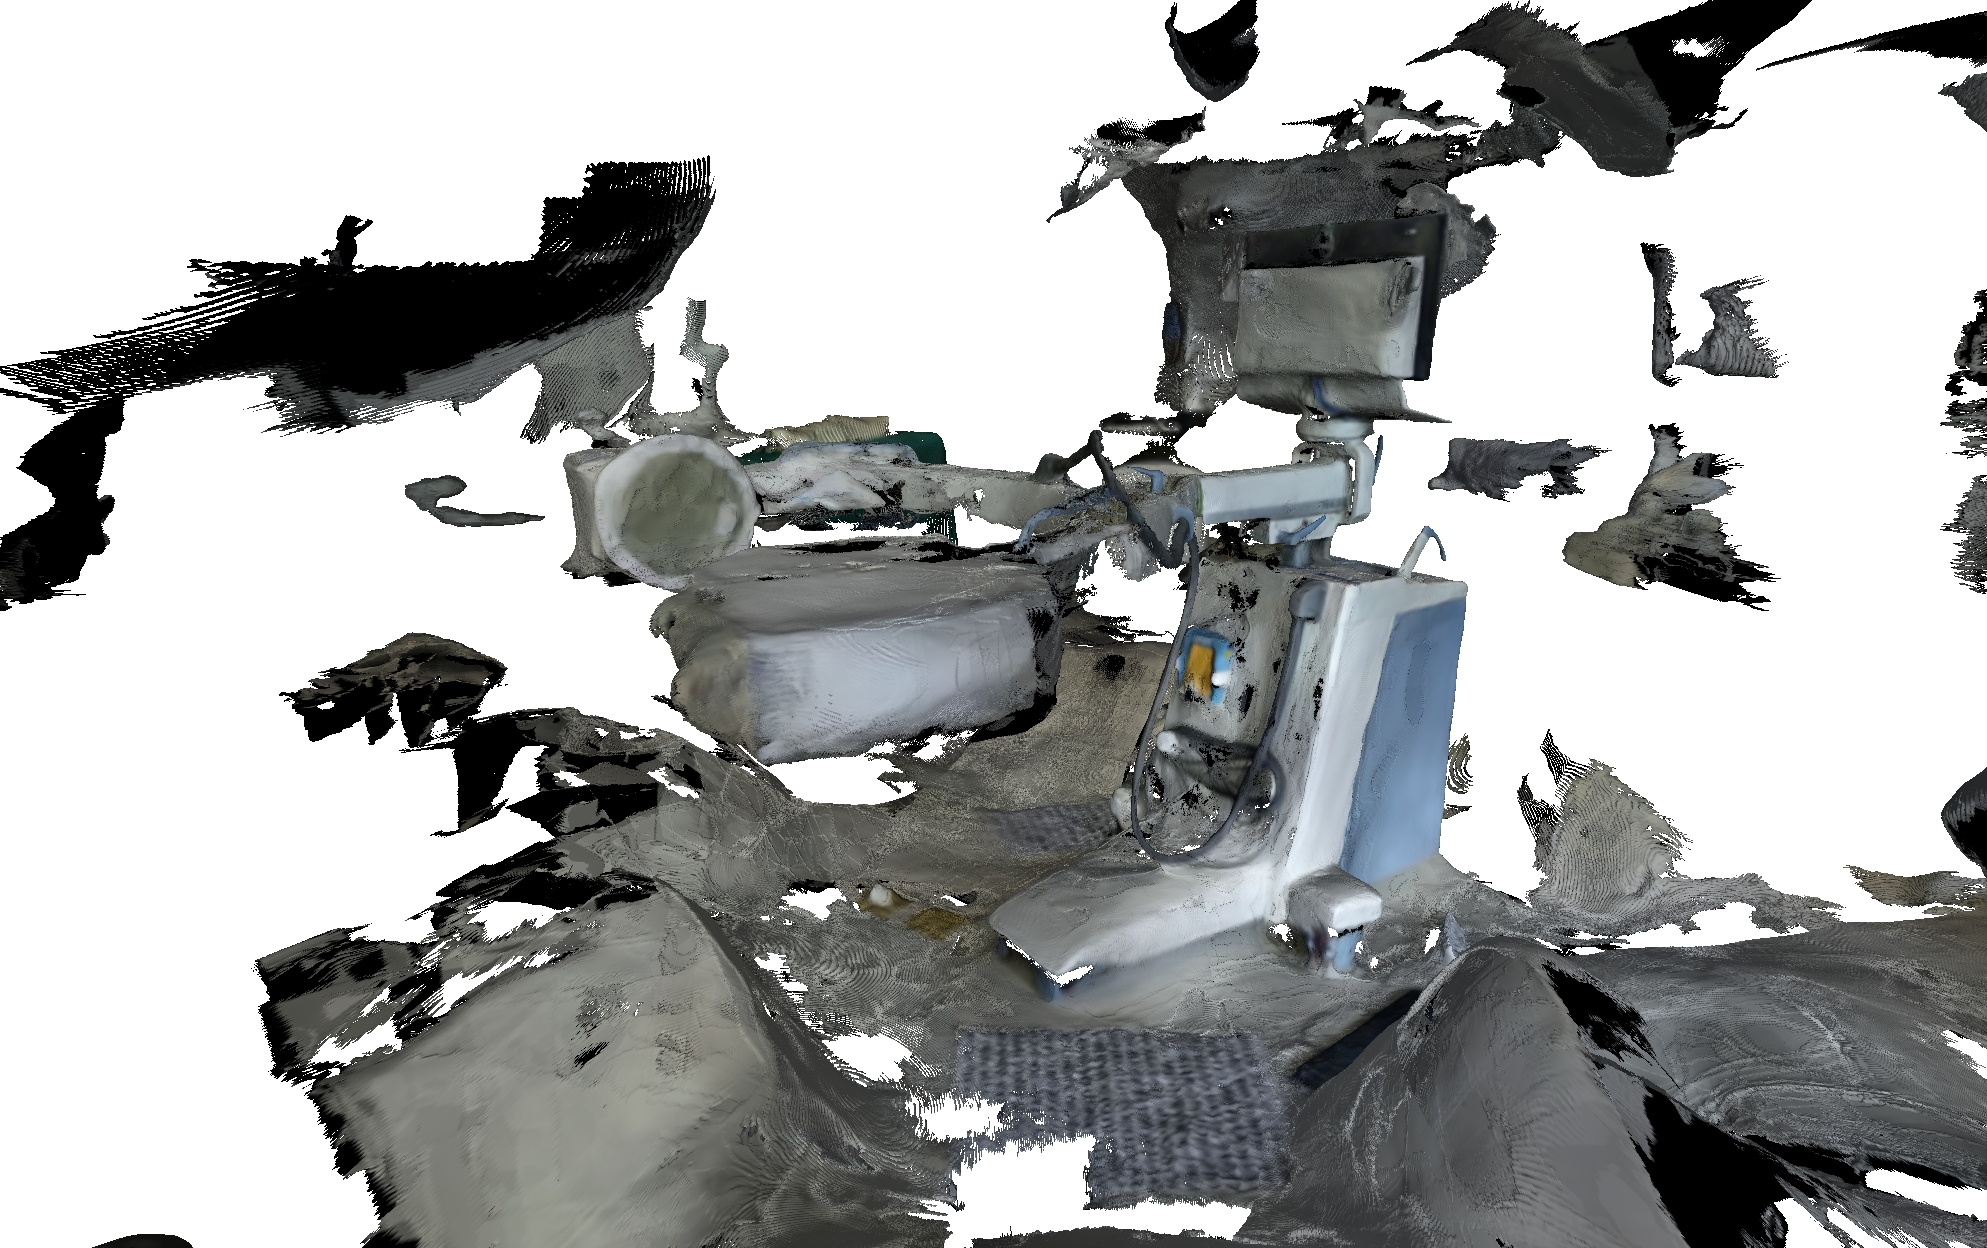
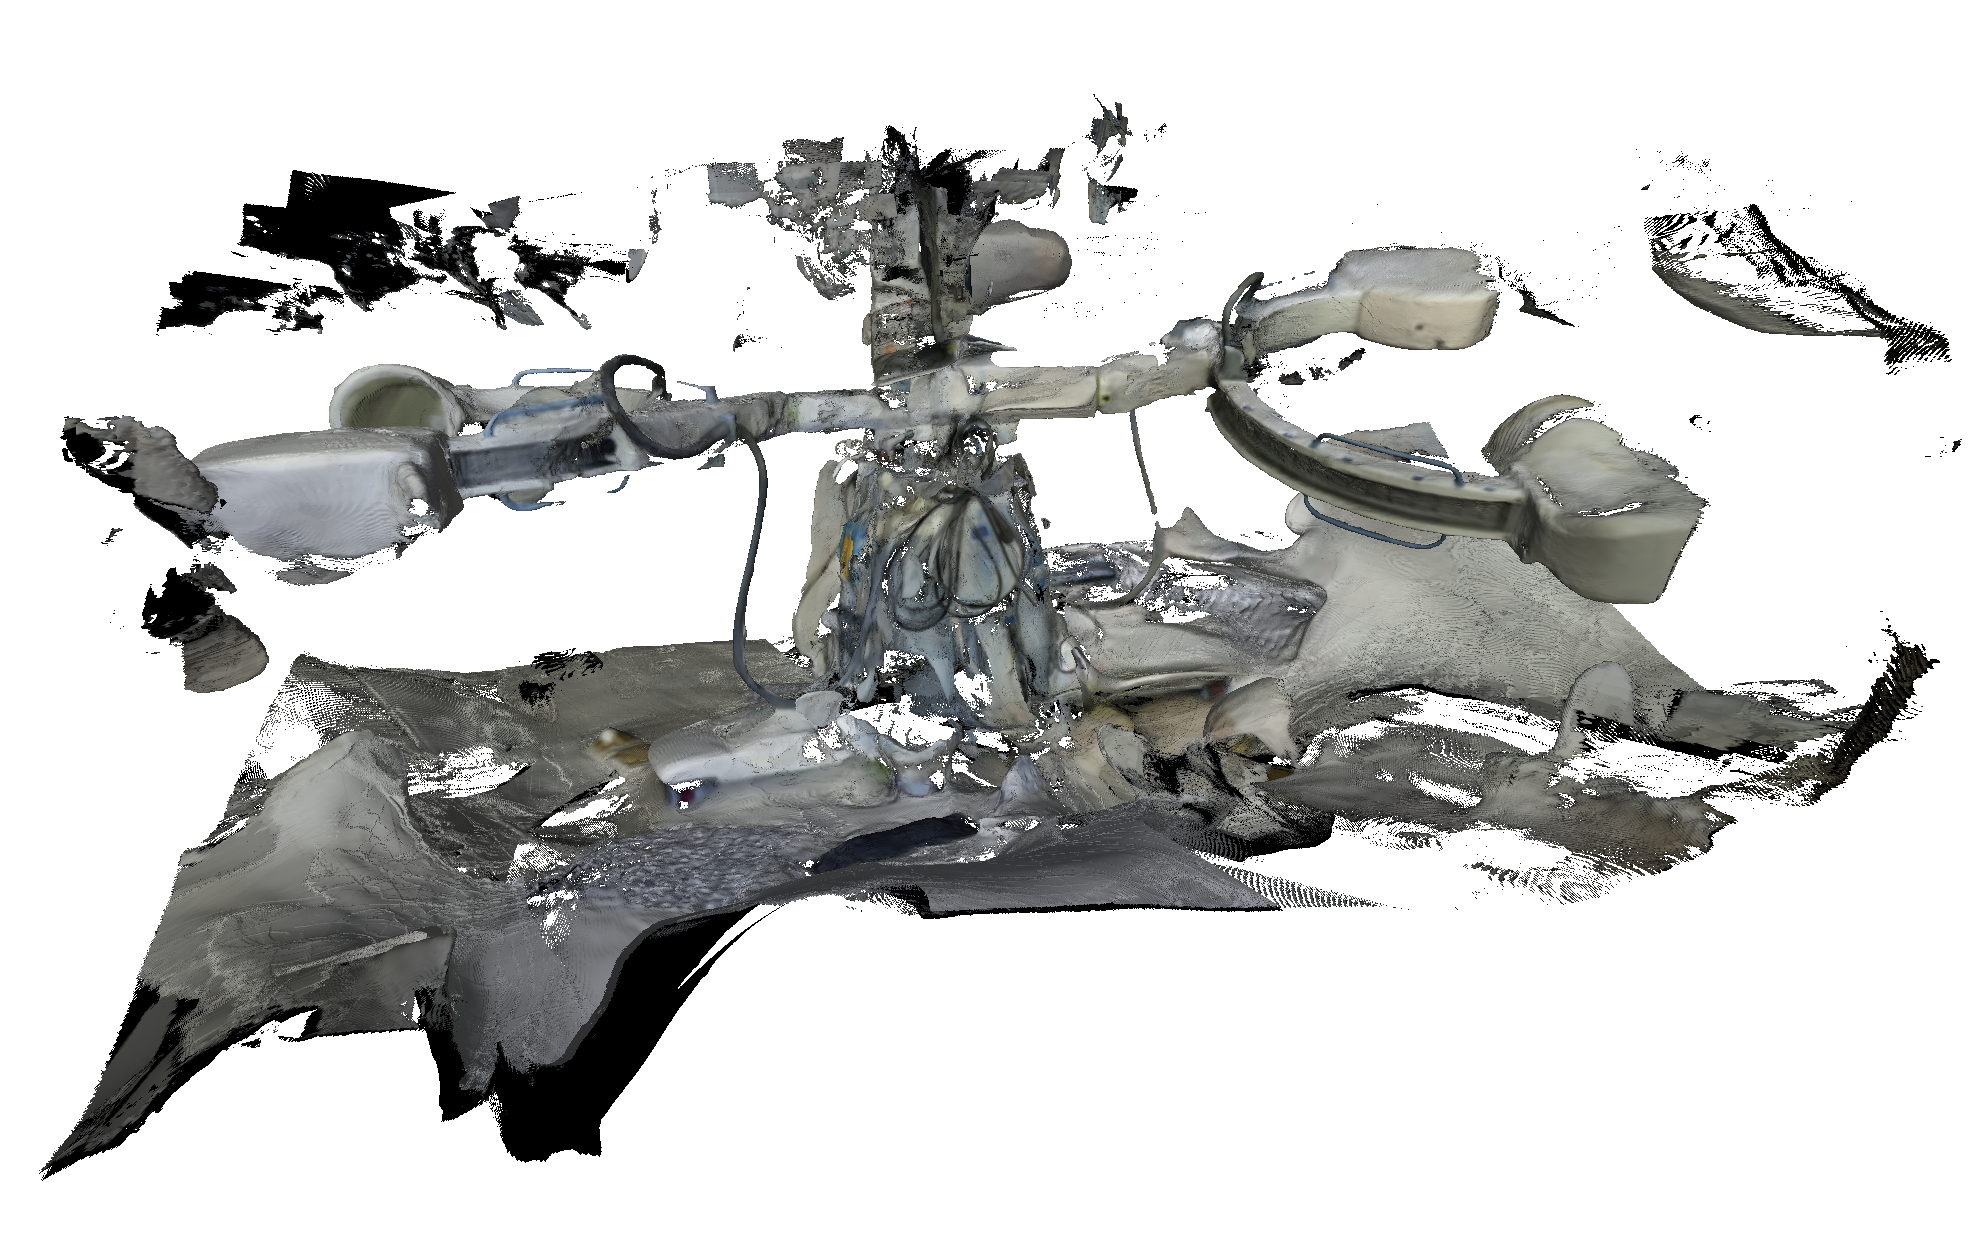
The results clearly show the C-arm but with some holes or missing parts in the mesh. Additionally, the scene contains background elements like signposts, since no mask was available to separate the C-arm (foreground) from the background.
Manually cleaning is to remove non-C-arm faces and vertices of the mesh. These non-C-arm structure arises because when I perform the mesh extraction, I did not have an image mask to separate the C-arm from the background. It is hard to create such image mask, even though powerful segmentation model such as SAM2 is publicly available.
I reckon the segmentation challenges are three-fold:
- Partial views: SAM2 segmentation model struggles to identify the whole C-arm in close-up images since only portions are visible.
- Low image resolution: The rendered images used for segmentation are much lower resolution than those SAM2 expects.
- Non-photorealistic renderings: Generated images sometimes lack photo-realism, limiting segmentation accuracy.
Estimating Surface Mesh via TSDF
To convert Gaussian splats into a dense volumetric scene, I used the Truncated Signed Distance Function (TSDF). Since, after training, we can render novel views, we use these noisy depth images from RGB rendered images (the camera poses are set according to how we would like to generate the scene). This integration operates on the voxel blocks.
Important note: The size of the voxel blocks is critical. If too small relative to the scene, memory usage explodes causing crashes. For my scene, voxel size 0.002 struck a good balance. After volume reconstruction, the mesh is extracted using algorithms like Marching Cubes.
Camera Pose Selection
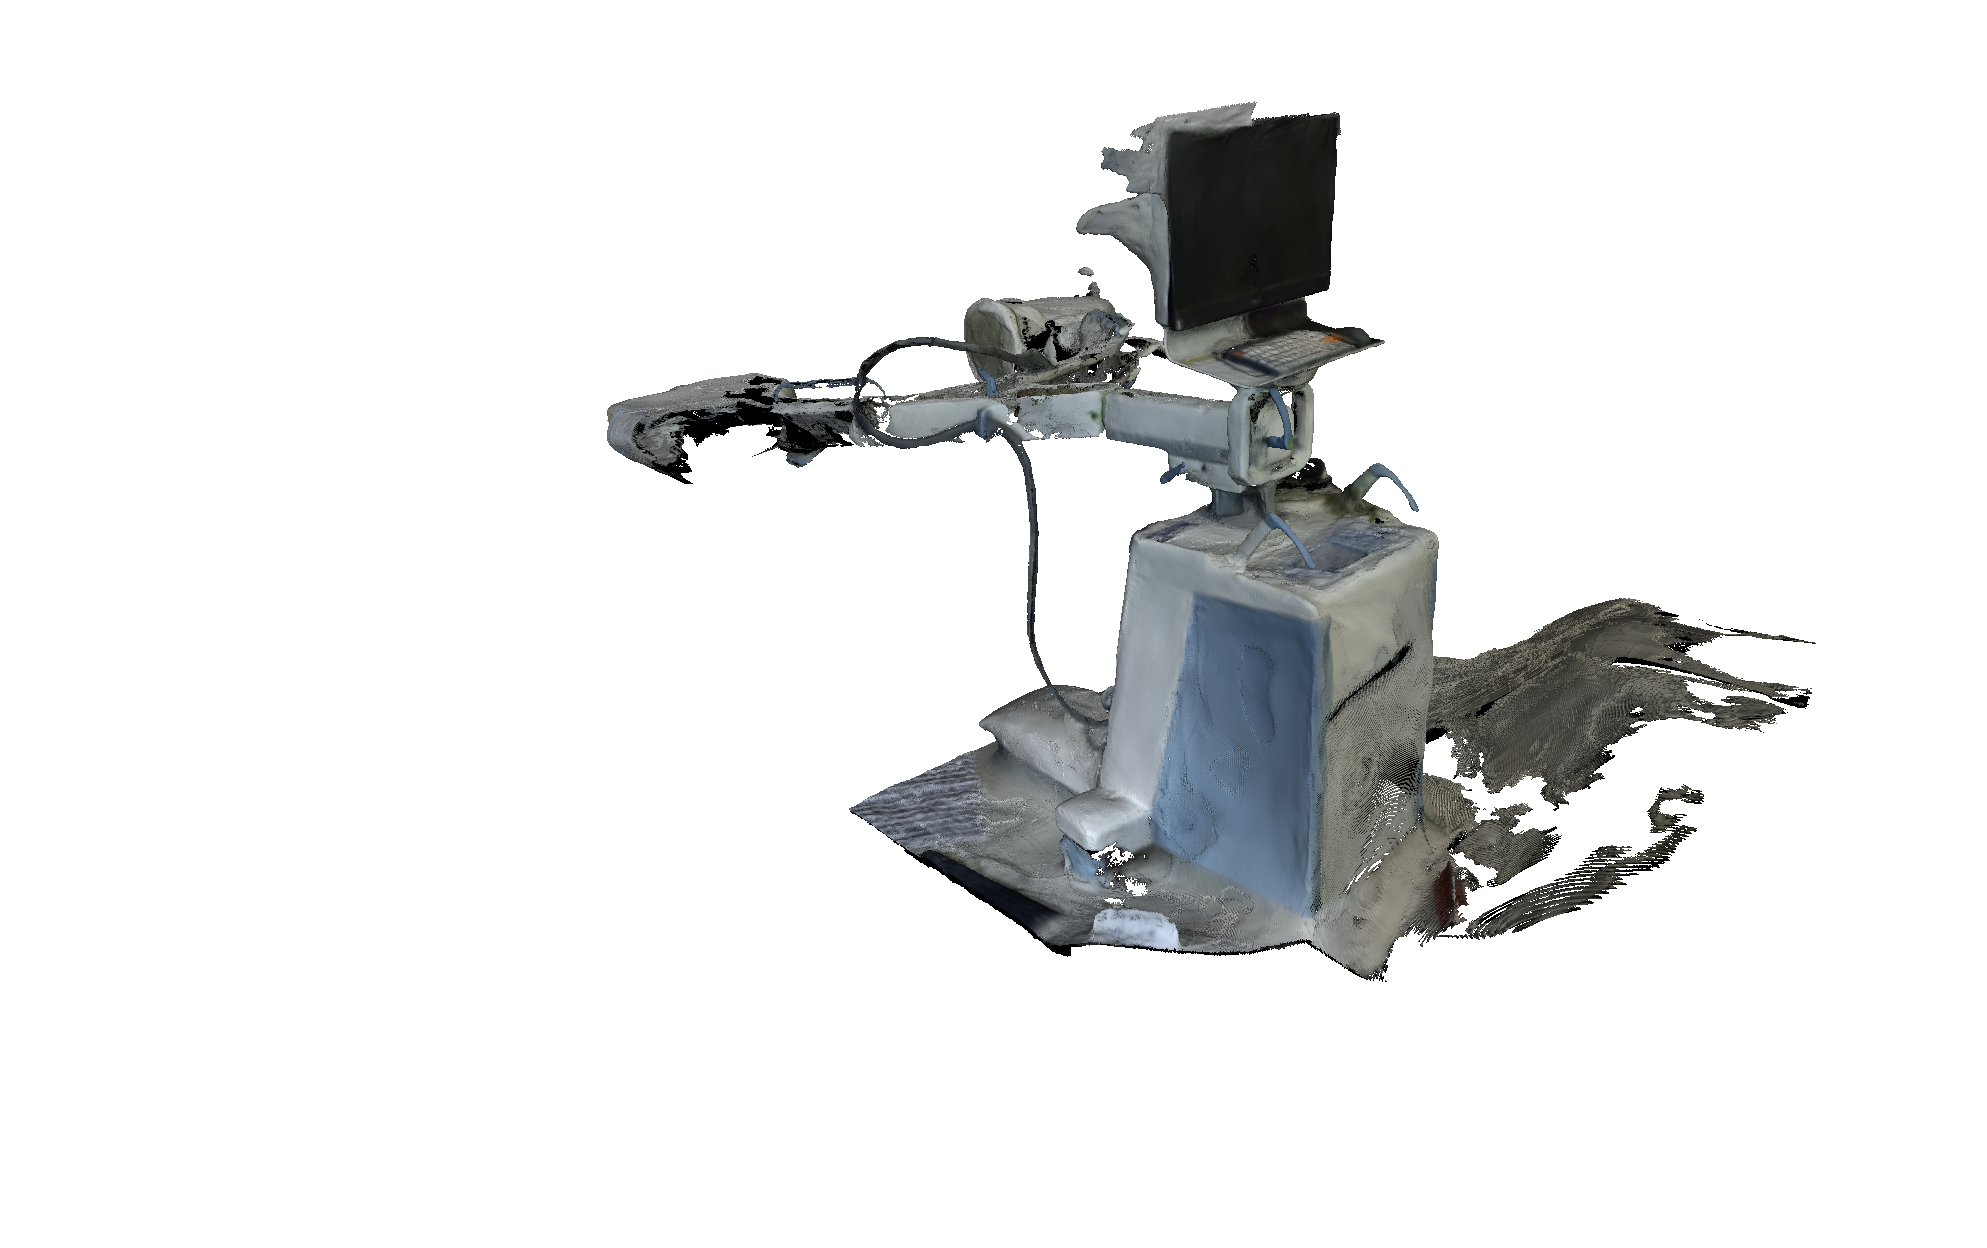
A good coverage of camera poses is essential to avoid holes or missing parts in the mesh (such as the base platform of the C-arm or wheels of the cart). Insufficient coverage leads to incomplete geometry recovery.
A simpler approach is to use an unbounded camera pose normalization:
- Normalize the scene into a unit sphere.
- Uniformly sample cameras on the sphere surface for full coverage.
- Perform TSDF fusion per voxel block and assemble volumes.
Anterior Posterior
Medial Lateral
Sparse Reconstruction Errors and Consequences
Once an erroneous sparse reconstruction is used to train a Gaussian Splatting model, the error manifests itself in an interesting way.
Take the above erroneous sparse reconstructed scene as an example, I trained a 2D Gaussian Splatting model and then extracted a mesh from it.
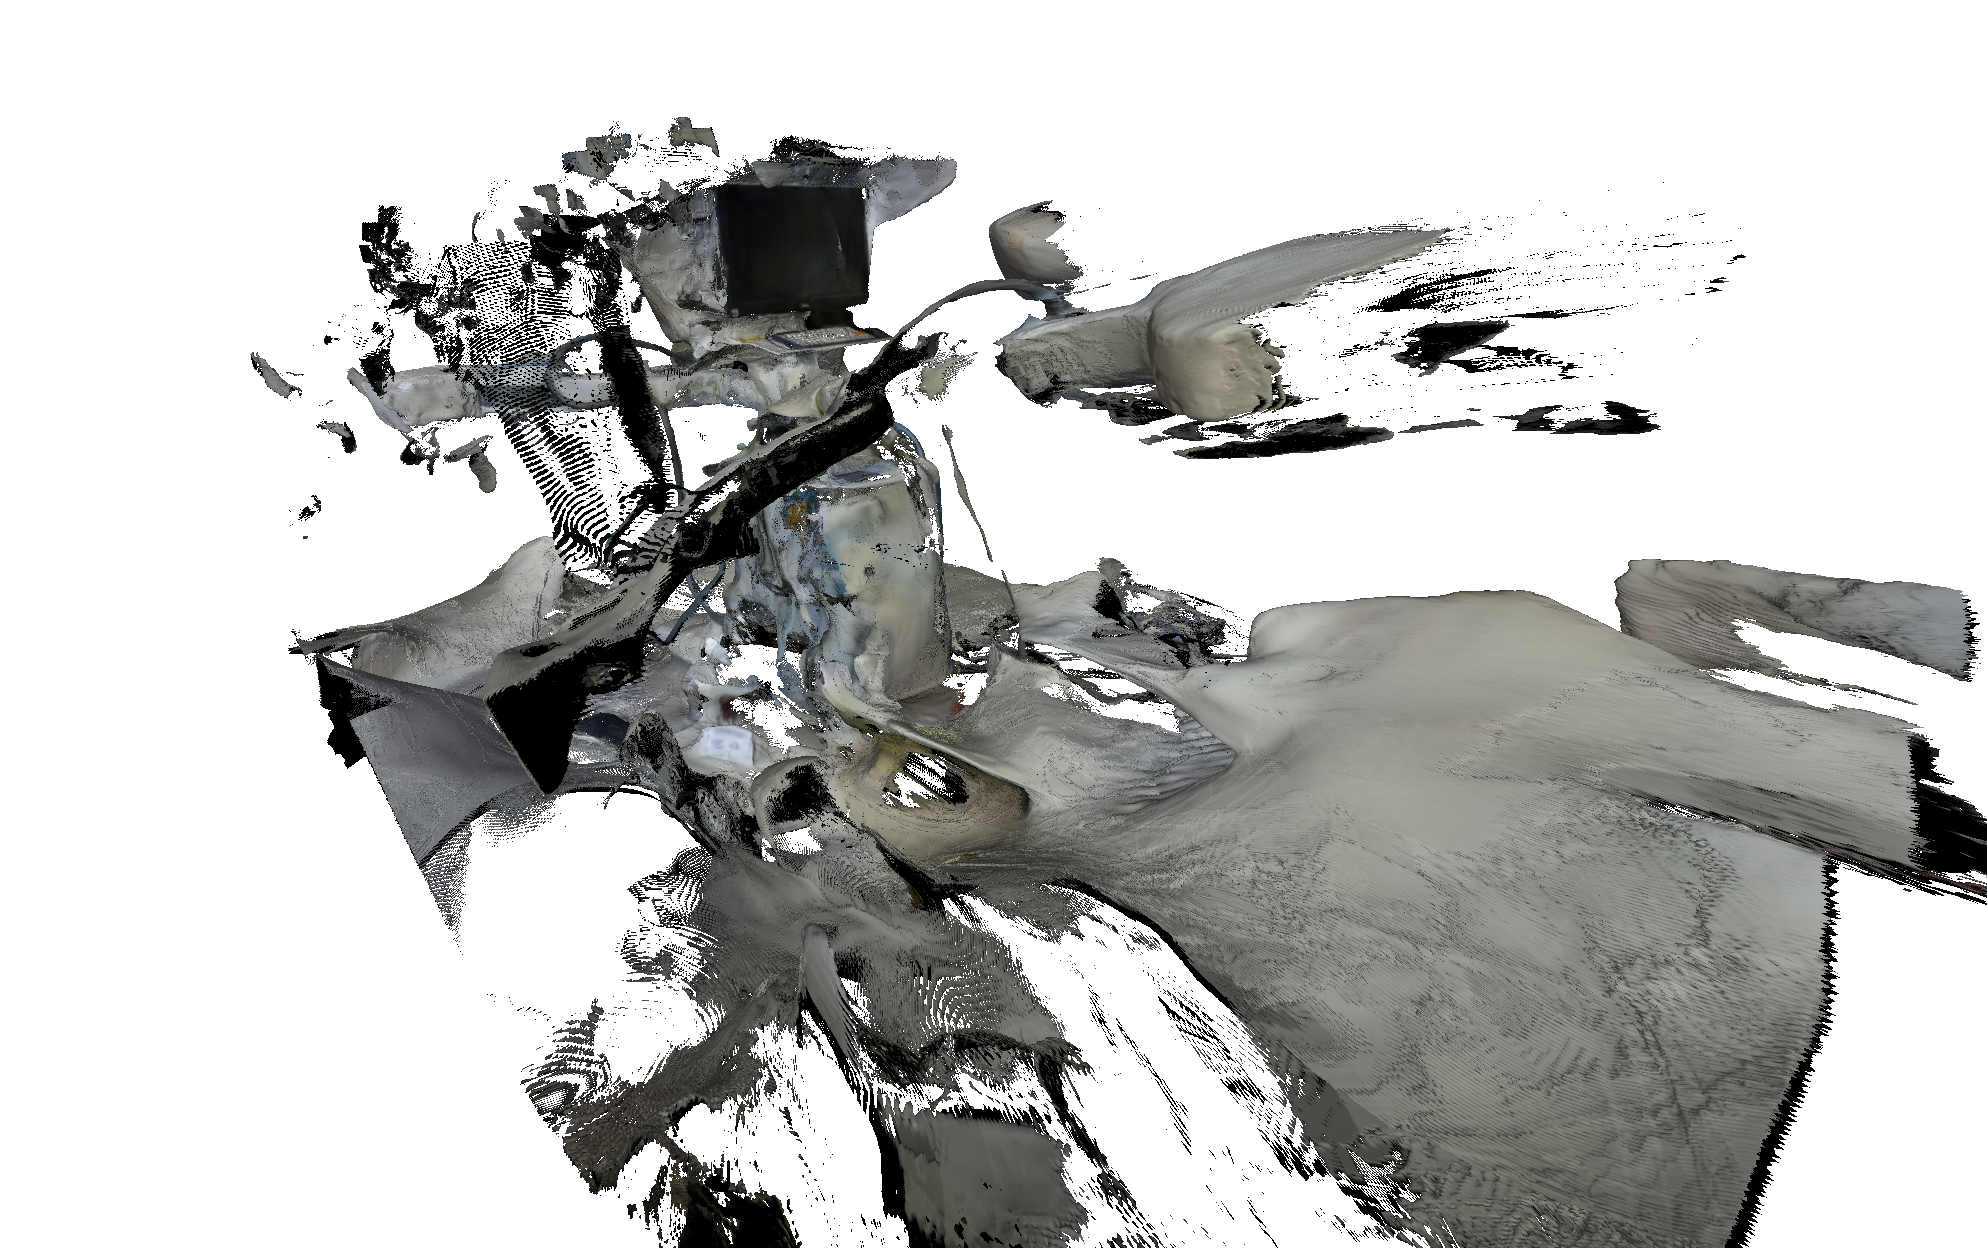
The model created an extra phantom C-arm on the back, very interesting results. The misaligned images suggest to the model that there is another phantom arm.
What is most intriguing about this result is that in terms of SSIM, PSNR, LPIPS, and reprojection errors, none suggests a huge error exists. That is why Splatvis or visualization is very important - a sure way to verify whether the result makes physical / common sense.
Rendered Videos (Novel Views) of C-arm by 2D Gaussian Splatting
Finally, this is the part we have been waiting for - rendering the exact same object / C-arm machine but in 100% novel views. To sample this novel camera poses, I defined a new trajectory (circular orbit) and placed cameras evenly.
2D Gaussian Splatting (Horizontal Camera filming) of a C-arm Machine in ML Orientation
Depth Map: 2D Gaussian Splatting (Horizontal Camera filming) of a C-arm Machine in ML Orientation
2D Gaussian Splatting (Horizontal Camera filming) of a C-arm Machine in AP Orientation
Depth map: 2D Gaussian Splatting (Horizontal Camera filming) of a C-arm Machine in AP Orientation
2D Gaussian Splatting (Vertical Camera filming) of a C-arm Machine in ML Orientation
Depth Map: 2D Gaussian Splatting (Vertical Camera filming) of a C-arm Machine in ML Orientation
2D Gaussian Splatting (Vertical Camera filming) of a C-arm Machine in AP Orientation
Depth Map: 2D Gaussian Splatting (Vertical Camera filming) of a C-arm Machine in AP Orientation
Enhanced Quality and Fidelity
My valuable lessons, failures and successes are written in Gaussian Splatting - Failure, Success, and Lesson Learned. Equipped with such hindsight, I improved the quality of the Gaussian Splatting outputs.
2D Gaussian Splatting using High Resolution Video of a C-arm Machine to enhance novel view generation
Gaussian Splatting: High Resolution C-arm Video to Enhance Novel View Generation from Smartphone
Normal Map - Gaussian Splatting: High Resolution C-arm Video to Enhance Novel View Generation from Smartphone
Depth Map - Gaussian Splatting: High Resolution C-arm Video to Enhance Novel View Generation from Smartphone
Following up next is Gaussian Splatting - Meshes and Beyond